🖥️ Creating New Games
In this guide, we’ll create a form that allows users to add new games to our database. We’ll also implement image upload functionality using Cloudinary, a cloud-based image management service.
Understanding the Challenge
Section titled “Understanding the Challenge”To create a complete game entry, we need to:
- Build a form to collect game details
- Create an image uploader component
- Set up a server endpoint to handle image uploads
- Connect to Cloudinary for image storage
- Save all the data to our database
Let’s break this down into manageable steps.
Stop the development server
Section titled “Stop the development server”If your server is still running, you will need to stop it.
To stop the server, press Ctrl + C (or Cmd + C on Mac) in your terminal.
Install Cloudinary
Section titled “Install Cloudinary”Before we can upload images to Cloudinary, we need to install the Cloudinary package. Run the following command in your terminal:
npm install cloudinaryCreate a Cloudinary account
Section titled “Create a Cloudinary account”If you have not already done so, sign up for a free Cloudinary account at cloudinary.com.
You should then see the Cloudinary dashboard.
Locate and add Cloudinary credentials
Section titled “Locate and add Cloudinary credentials”Sign into your Cloudinary account.
Look carefully for a button that says ‘View API Keys’. It should look like the one below:
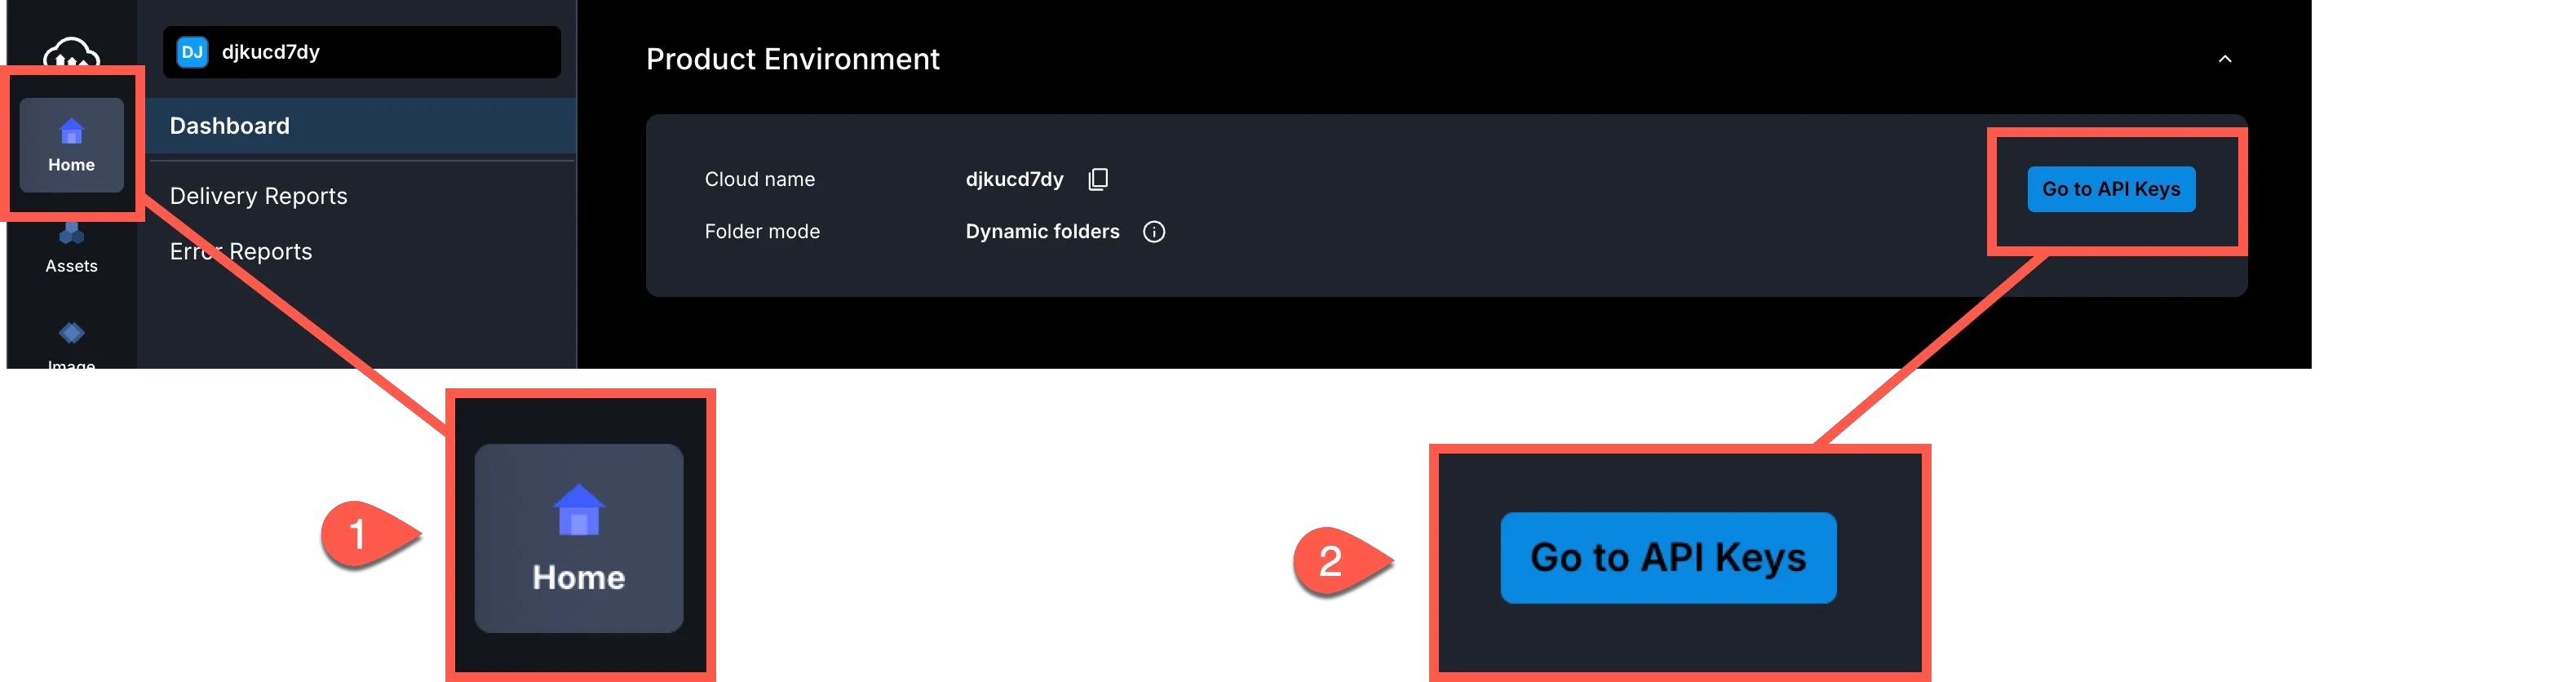
Once you click this, you will have access to your Cloudinary credentials.
To upload images to Cloudinary, we need to:
- generate an API key in Cloudinary
- store our Cloudinary credentials in environment variables
Follow the steps below carefully to get this done.
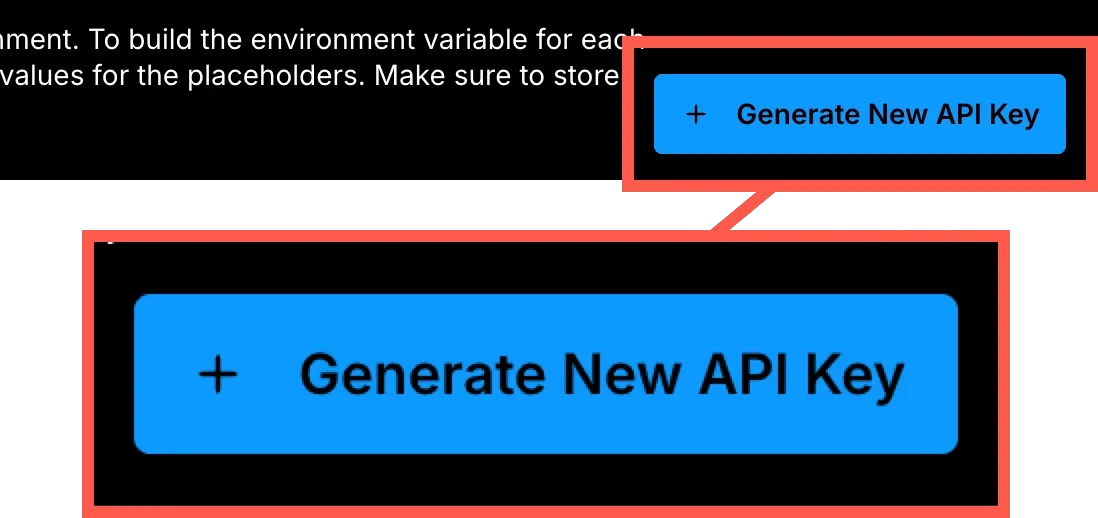
Generating an API key
Section titled “Generating an API key”-
Click the + Generate New API Key button in the top right of your screen:
-
Open the
.envfile in the root of your project and add the following variables beneath the one already there:.env DATABASE_URL="file:./data.db?connection_limit=1"CLOUDINARY_CLOUD_NAME=your_cloud_nameCLOUDINARY_API_KEY=your_api_keyCLOUDINARY_API_SECRET=your_api_secret -
Replace
your_cloud_name,your_api_key, andyour_api_secretwith the values from your Cloudinary account shown below: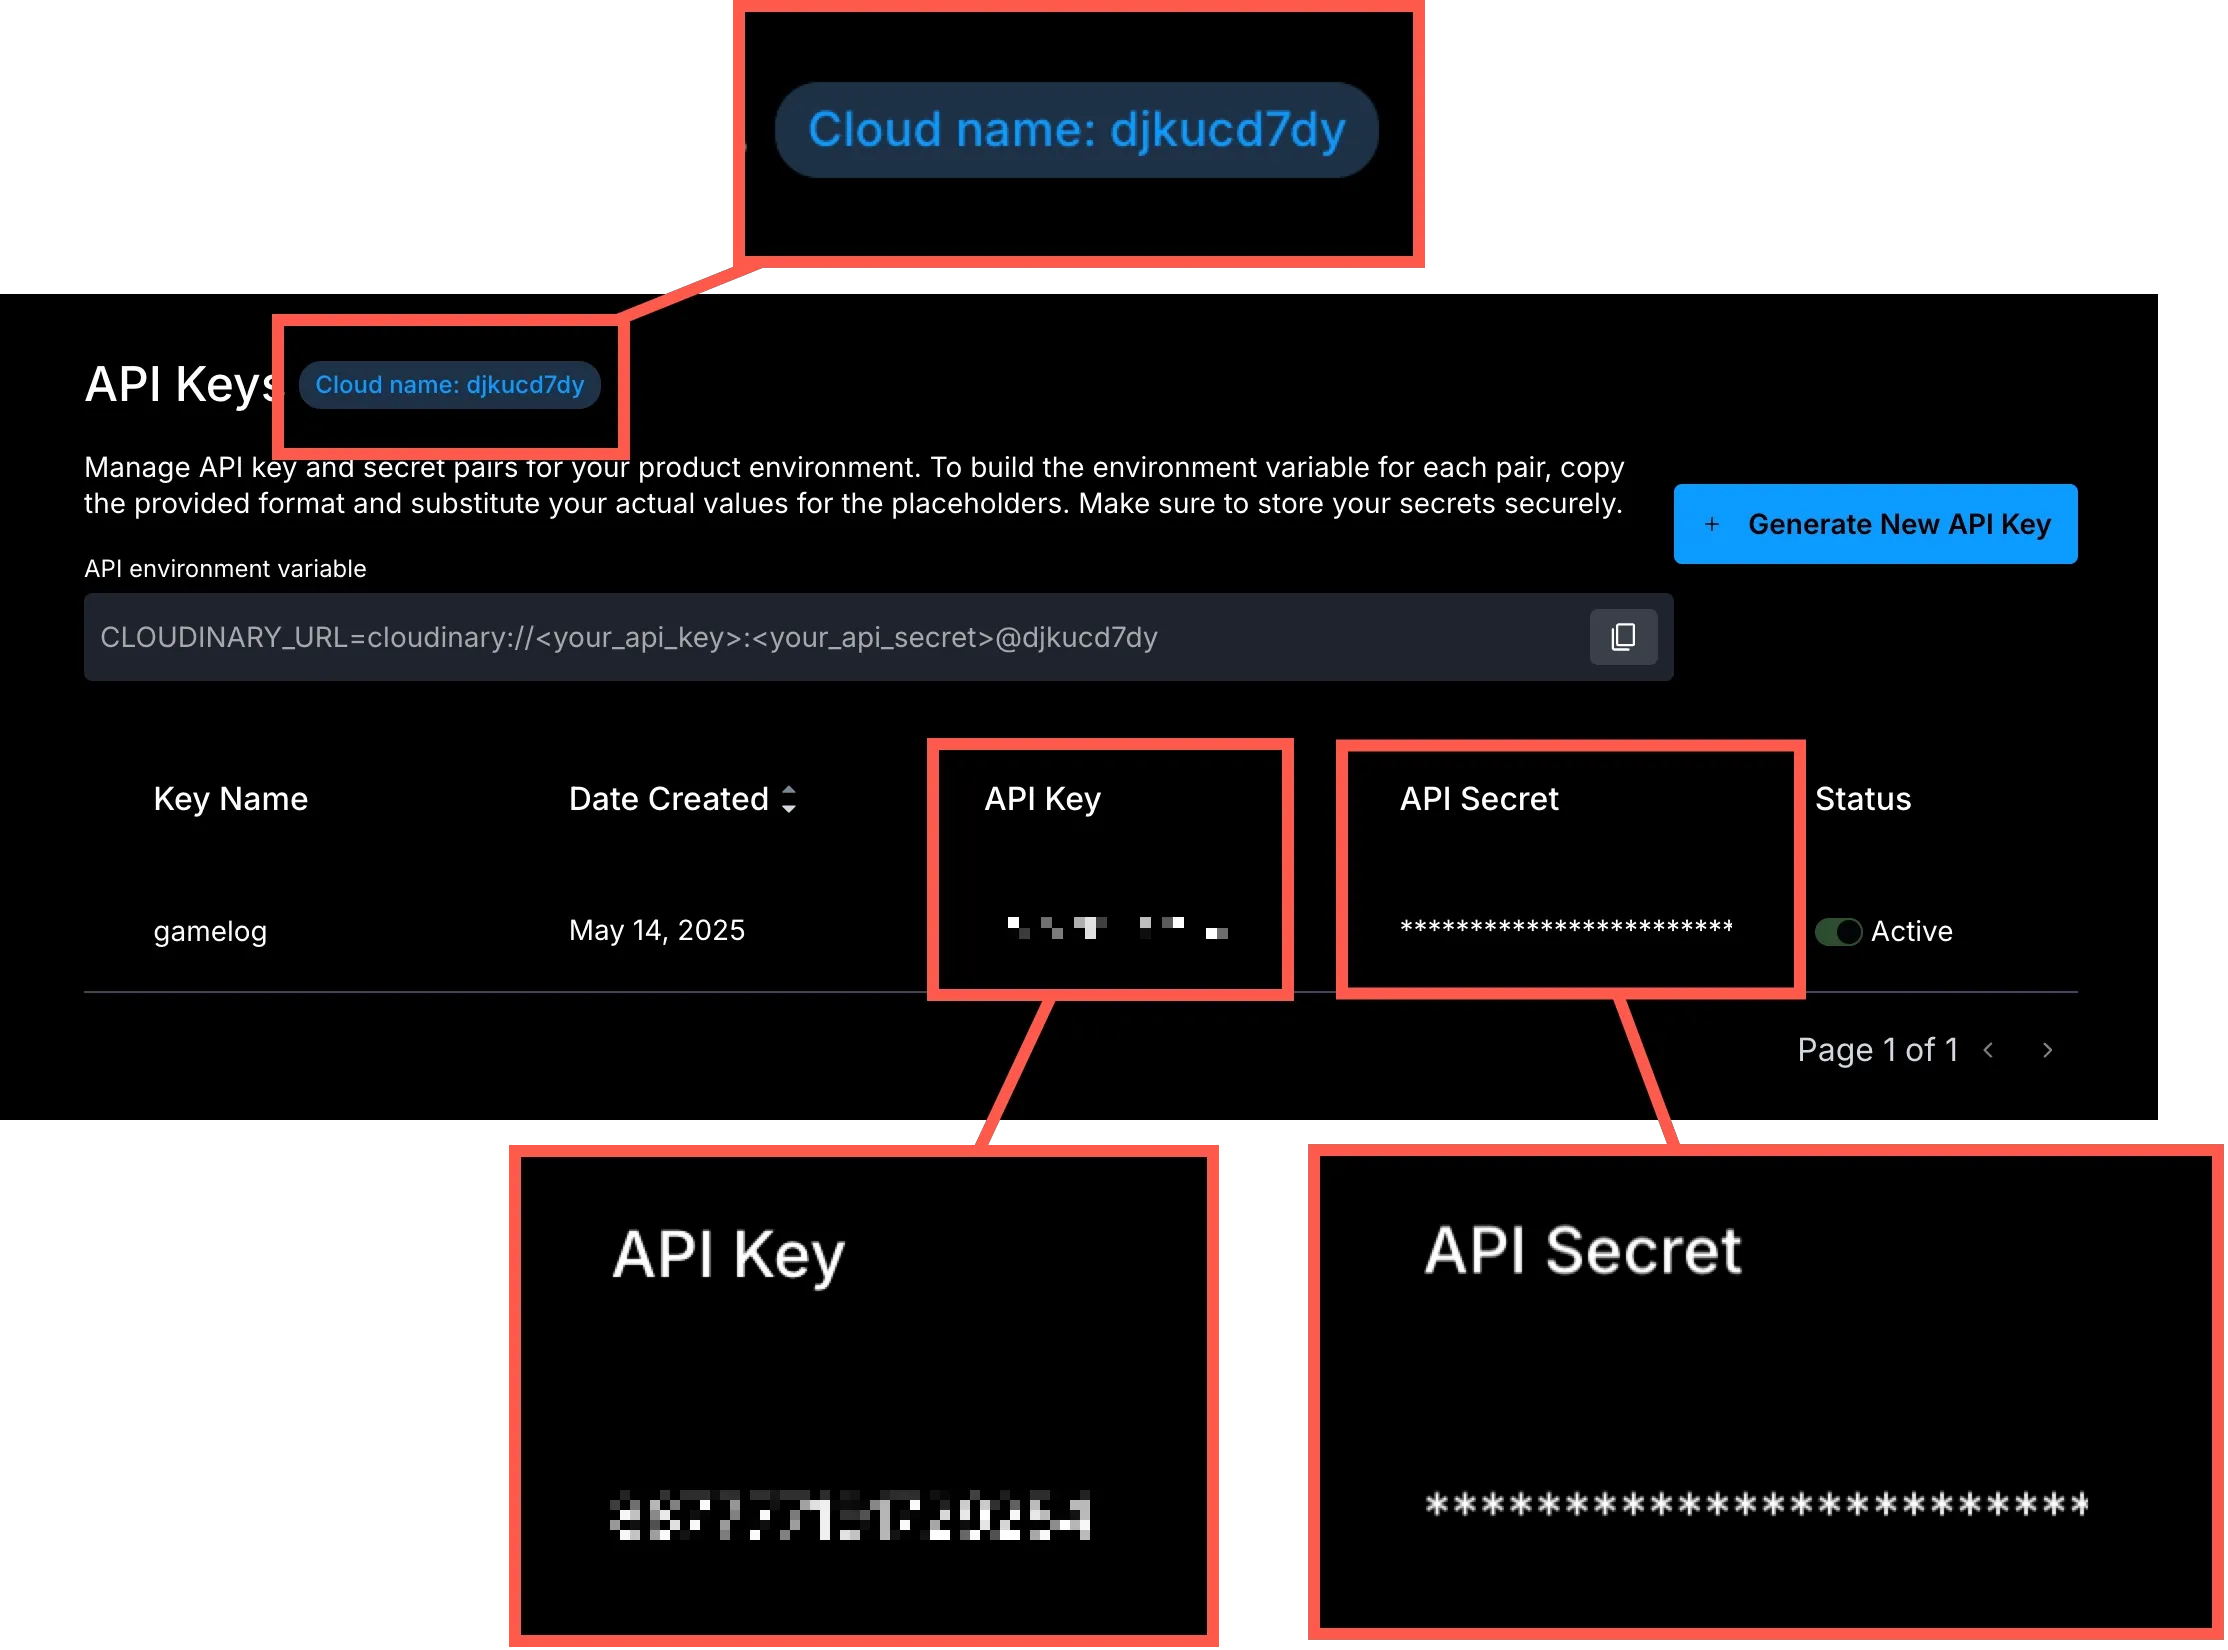
With these in place, we are now ready to create our image uploader.
Step 1: Create an Image Uploader Component
Section titled “Step 1: Create an Image Uploader Component”First, we’ll create a reusable component for uploading images. This component will:
- Allow users to select an image file
- Show a preview of the selected image
- Upload the image to Cloudinary
- Return the URL of the uploaded image
Add a new file at app/components/ImageUploader.tsx and add the following code:
import { useState, useRef } from "react";import { useFetcher } from "@remix-run/react";
// Define the response type from the upload APIinterface UploadResponse {  imageUrl?: string;  error?: string;}
interface ImageUploaderProps {  onImageUploaded: (imageUrl: string) => void;}
export default function ImageUploader({ onImageUploaded }: ImageUploaderProps) {  const [preview, setPreview] = useState<string | null>(null);  const [isUploading, setIsUploading] = useState(false);  const fileInputRef = useRef<HTMLInputElement>(null);  const fetcher = useFetcher<UploadResponse>();
  const handleFileChange = (e: React.ChangeEvent<HTMLInputElement>) => {    const file = e.target.files?.[0];    if (!file) return;
    const reader = new FileReader();    reader.onloadend = () => {      setPreview(reader.result as string);    };    reader.readAsDataURL(file);  };
  const handleUpload = async () => {    if (!preview) return;
    setIsUploading(true);    const formData = new FormData();    formData.append("image", preview);
    fetcher.submit(formData, {      method: "post",      action: "/api/upload",      encType: "multipart/form-data",    });  };
  // Handle the response from the upload  if (fetcher.data?.imageUrl && isUploading) {    setIsUploading(false);    onImageUploaded(fetcher.data.imageUrl);  }
  // Handle errors  if (fetcher.state === "idle" && isUploading && fetcher.data?.error) {    setIsUploading(false);  }
  return (    <div className="flex flex-col gap-1">      <label        htmlFor="image"        className="block text-sm font-medium mb-2 text-slate-400"      >        Image      </label>      <div className="relative h-72 overflow-hidden bg-gray-800 rounded-xl">        {preview ? (          <img            src={preview}            alt="Preview"            className="absolute inset-0 w-full h-full object-cover"          />        ) : (          <div className="flex items-center justify-center h-full">            <p className="text-gray-400">No image selected</p>          </div>        )}      </div>
      <div className="flex gap-4 mt-4 justify-end">        <input          type="file"          accept="image/*"          onChange={handleFileChange}          ref={fileInputRef}          className="hidden"        />
        <button          type="button"          onClick={() => fileInputRef.current?.click()}          className="bg-gray-700 text-white px-4 py-2 rounded-md transition hover:bg-gray-800"        >          Select Image        </button>
        <button          type="button"          onClick={handleUpload}          disabled={!preview || isUploading}          className={`px-4 py-2 rounded-md ${            !preview || isUploading              ? "bg-gray-600 text-gray-400 transition hover:bg-gray-600 disabled:hover:bg-gray-600 disabled:cursor-not-allowed"              : "bg-cyan-600 text-white"          }`}        >          {isUploading ? "Uploading..." : "Upload"}        </button>      </div>
{fetcher.data?.error && ( <p className="text-red-500">{fetcher.data.error}</p> )} </div> );}Step 2: Create a Cloudinary Integration
Section titled “Step 2: Create a Cloudinary Integration”Next, we’ll create a server-side utility to handle the Cloudinary integration. This will securely upload our images to Cloudinary and return the URL.
Create a new file at app/utils/cloudinary.server.ts and add the following code:
import { v2 as cloudinary } from "cloudinary";
cloudinary.config({  cloud_name: process.env.CLOUDINARY_CLOUD_NAME,  api_key: process.env.CLOUDINARY_API_KEY,  api_secret: process.env.CLOUDINARY_API_SECRET,});
export async function uploadImage(imageData: string) { try { const result = await cloudinary.uploader.upload(imageData, { folder: "game-covers", }); return result.secure_url; } catch (error) { console.error("Cloudinary upload error:", error); throw new Error("Failed to upload image"); }}Step 3: Create an API Route for Image Uploads
Section titled “Step 3: Create an API Route for Image Uploads”Now, we’ll create an API route that our ImageUploader component can call to upload images.
Create a new file at app/routes/api.upload.tsx and add the following code:
import { json } from "@remix-run/node";import type { ActionFunctionArgs } from "@remix-run/node";import { uploadImage } from "~/utils/cloudinary.server";
export async function action({ request }: ActionFunctionArgs) {  if (request.method !== "POST") {    return json({ error: "Method not allowed" }, { status: 405 });  }
  try {    const formData = await request.formData();    const imageData = formData.get("image") as string;
    if (!imageData) {      return json({ error: "No image provided" }, { status: 400 });    }
const imageUrl = await uploadImage(imageData); return json({ imageUrl }); } catch (error) { console.error("Upload error:", error); return json({ error: "Failed to upload image" }, { status: 500 }); }}Step 4: Create the Add Game Form
Section titled “Step 4: Create the Add Game Form”Finally, we’ll create the main form for adding new games, which will use our ImageUploader component.
Create a new file at app/routes/add-game.tsx and add the following code:
import { useState } from "react";import { Form, Link, useLoaderData } from "@remix-run/react";import { json, redirect } from "@remix-run/node";import type { ActionFunctionArgs } from "@remix-run/node";import { PrismaClient } from "@prisma/client";import ImageUploader from "~/components/ImageUploader";
export async function loader() {  const prisma = new PrismaClient();  const categories = await prisma.category.findMany({    select: { id: true, title: true },    orderBy: { title: "asc" },  });
  prisma.$disconnect();
  return json({ categories });}
export async function action({ request }: ActionFunctionArgs) {  const formData = await request.formData();  const title = formData.get("title") as string;  const description = formData.get("description") as string;  const price = parseFloat(formData.get("price") as string);  const rating = parseFloat(formData.get("rating") as string);  const releaseDate = new Date(formData.get("releaseDate") as string);  const imageUrl = formData.get("imageUrl") as string;  const categoryId = formData.get("categoryId") as string;
  const prisma = new PrismaClient();
  await prisma.game.create({    data: {      title,      description,      price,      rating,      releaseDate,      imageUrl,      categoryId,    },  });
  prisma.$disconnect();
  return redirect("/");}
export default function AddGame() {  const { categories } = useLoaderData<typeof loader>();  const [imageUrl, setImageUrl] = useState("");
  const handleImageUploaded = (url: string) => {    setImageUrl(url);  };
  return (    <div className="container mx-auto py-20 px-4">      <h1 className="font-bold text-5xl text-center mb-10">        Add <span className="text-cyan-400">Game</span>      </h1>
      <div className="max-w-2xl mx-auto bg-gray-950 p-8 rounded-xl">        <Form method="post" className="space-y-6">          <input type="hidden" name="imageUrl" value={imageUrl} />
          <div>            <label              htmlFor="title"              className="block text-sm font-medium mb-2 text-slate-400"            >              Title            </label>            <input              type="text"              id="title"              name="title"              required              className="w-full p-3 bg-gray-800 rounded-md focus:outline-none focus:ring-2 focus:ring-cyan-500"            />          </div>
          <div>            <label              htmlFor="description"              className="block text-sm font-medium mb-2 text-slate-400"            >              Description            </label>            <textarea              id="description"              name="description"              required              rows={4}              className="w-full p-3 bg-gray-800 rounded-md focus:outline-none focus:ring-2 focus:ring-cyan-500"            ></textarea>          </div>
          <div className="mb-8">            <ImageUploader onImageUploaded={handleImageUploaded} />          </div>
          {/* Additional form fields for price, rating, etc. */}
          <div className="grid grid-cols-2 gap-4">            <div>              <label                htmlFor="price"                className="block text-sm font-medium mb-2 text-slate-400"              >                Price              </label>              <input                type="number"                id="price"                name="price"                step="0.01"                min="0"                required                className="w-full p-3 bg-gray-800 rounded-md focus:outline-none focus:ring-2 focus:ring-cyan-500"              />            </div>
            <div>              <label                htmlFor="rating"                className="block text-sm font-medium mb-2 text-slate-400"              >                Rating              </label>              <input                type="number"                id="rating"                name="rating"                step="0.1"                min="0"                max="5"                required                className="w-full p-3 bg-gray-800 rounded-md focus:outline-none focus:ring-2 focus:ring-cyan-500"              />            </div>          </div>
          <div>            <label              htmlFor="releaseDate"              className="block text-sm font-medium mb-2 text-slate-400"            >              Release Date            </label>            <input              type="date"              id="releaseDate"              name="releaseDate"              required              className="w-full p-3 bg-gray-800 rounded-md focus:outline-none focus:ring-2 focus:ring-cyan-500"            />          </div>
          <div>            <label              htmlFor="categoryId"              className="block text-sm font-medium mb-2 text-slate-400"            >              Category            </label>            <select              id="categoryId"              name="categoryId"              required              className="w-full p-3 bg-gray-800 rounded-md focus:outline-none focus:ring-2 focus:ring-cyan-500"            >              <option value="">Select a category</option>              {categories.map((category) => (                <option key={category.id} value={category.id}>                  {category.title}                </option>              ))}            </select>          </div>
<div className="flex justify-end gap-16"> <Link to="/" className=" text-red-300 border-2 border-red-300 py-3 px-6 rounded-md hover:bg-red-50/10 transition duration-200" > Cancel </Link> <button type="submit" className=" bg-cyan-600 text-white py-3 px-6 rounded-md hover:bg-cyan-500 transition duration-200" > Add Game </button> </div> </Form> </div> </div> );}Understanding Key Concepts
Section titled “Understanding Key Concepts”Remix Action Functions
Section titled “Remix Action Functions”In Remix, an action function handles form submissions and other non-GET requests. It runs on the server and receives the request object, which contains the form data. The action function can:
- Process the form data
- Interact with the database
- Return a response, such as redirecting to another page
Action functions are defined in route files and are automatically called when a form is submitted to that route.
The FormData Object
Section titled “The FormData Object”The FormData object is a browser API that represents form data. In Remix:
- When a form is submitted, Remix automatically creates a FormData object
- In the action function, we can access this data using
request.formData() - We can extract values using
formData.get("fieldName") - We need to cast these values to the appropriate types (string, number, etc.)
FormData is also useful for programmatically creating form submissions, as we do in the ImageUploader component.
Test your image uploader
Section titled “Test your image uploader”To test your image uploader, run the following command in your terminal to start the development server:
npm run devThen, navigate to http://localhost:3000/add-game in your browser.
You should see a form with an image uploader. Try uploading an image and check the console for any errors.
Cloudinary Integration
Section titled “Cloudinary Integration”Our Cloudinary integration consists of three parts:
-
Server-side utility (
cloudinary.server.ts):- Configures the Cloudinary SDK with our account credentials
- Provides a function to upload images to Cloudinary
- Returns the URL of the uploaded image
-
API route (
api.upload.tsx):- Receives the image data from the client
- Calls the server-side utility to upload the image
- Returns the image URL to the client
-
Client-side component (
ImageUploader.tsx):- Allows the user to select an image
- Sends the image data to the API route
- Receives the image URL and passes it to the parent component
This separation of concerns keeps our code organized and secure, with sensitive operations happening on the server.
What We’ve Learned
Section titled “What We’ve Learned”In this tutorial, we’ve:
- Created a reusable image uploader component
- Set up a Cloudinary integration for storing images
- Created an API route for handling image uploads
- Built a form for adding new games to our database
- Learned about Remix action functions and form handling
These concepts form the foundation for creating interactive web applications with Remix and Prisma.
Congratulations! You’ve built a complete form with image upload functionality. This is a significant achievement that combines many important web development concepts. You can now add new games to your database with images, making your application more dynamic and user-friendly.